My contribution to Firefox Focus

As part of my last release i have i decided to work on a more complicated case. This time around i did not fix relatively easy issue, but rather picked up a complicated task that requires more time and knowledge to be invested.  I have pushed code that resets Mozilla Focus browser settings to default. It is essentially a new feature that has not been implemented into the browser yet.

First of all lets define what Mozilla Focus is and what it is used for. Mozilla Focus is a mobile application that provides the user with secure browsing environment as if no one’s watching. The new Firefox Focus automatically blocks a wide range of online trackers — from the moment you launch it to the second you leave it. Easily erase your history, passwords and cookies, so you won’t get followed by things like unwanted ads. It is a very nice browser i regularly use myself. It is getting more and more popular lately,  especially after all the security issues major companies have had and the news that have been leaked. The public gets more concerned with what happens to their private data and how it is can be used against them. Thus people start investing into secure and seemingly harmless applications (as of right now). Mozilla Focus is an open source project that provides support for two major mobile platforms Android and IOS. I will contribute to the the Android version of Focus open source project that is hosted on GitHub. The project is a very active and has around 400 open bugs. So i believe it is a good place to contribute to and gain some valuable Android experience.

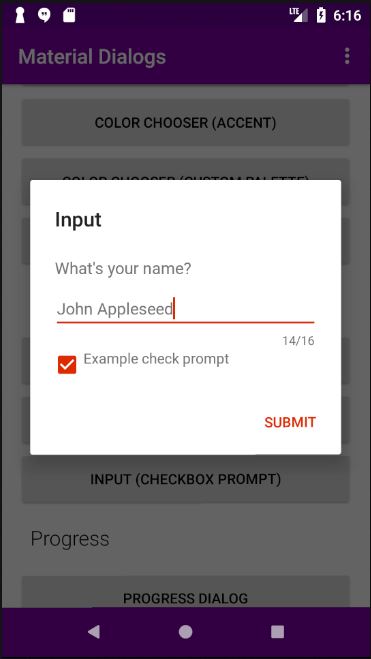
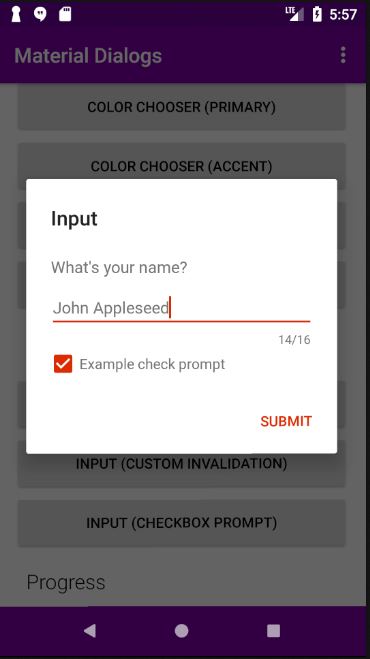
The feature (#1848) i worked on is related to adding a functionality that would reset the the current browser settings to default. Meaning all the preferences like language, block social trackers, block JavaScript should be cleared and the all the default preferences have to be reused. The Setting tab of the Firefox Focus has a lot of preferences thus is is handy to add a button/preference that would simply remove all the settings with a single click. Here is how the Settings view looks like with all the main preferences:

28wdwj.gif

As you can see there are a lot of things the user can set, so to make the UI more friendly we need to make sure the user can rollback to default any time and with ease. Lets begin coding.

First of all i added the preference XML code to the settings.xml that would represent a button the user can click.

<Preference
    android:key="@string/pref_key_reset_default_browser"
    android:title="@string/preference_browser_default_settings"
    android:summary="@string/preference_browser_default_settings_summary"
    android:defaultValue="false" />

Note how differently the above XML code is written. Usually the XML class has an Id attribute to identify the class and text attribute to set the class label text. However that strategy would require two classes to represent one button since the XML would link two labels to represent single Button title and summary. On the other hand, Mozilla Focus developers use Preference XML class that has key instead of Id, title to represent button header and summary to represent button description. To be honest i have newer seen this type of advanced XML before and it is truly amazing to get to know new trick. So Preference is not just a button, but rather a very smart button that allows the developer to customize the looks and the functionality of the Preference. This seemingly simple XML code made me question my Android skills for a second or two:)

Note that title and summary string resources have been added to the strings.xml to represent the following text in English:

<!-- Action header to reset the browser settings to default. --> 
<string name="preference_browser_default_settings">Reset</string>

<!-- Action summary for reset the browser settings. -->  
<string name="preference_browser_default_settings_summary">Reset browser settings to default</string>

Ok so once the button is added we can finally take a look at the UI and check out if the newly added preference fits the design.

device-2018-04-22-224410.png

Looks stunning, mostly because the UI looks awesome already!

Now is time to add the largest code snippet that would link the preference with a listener that would respond to the event in SettingsFragment.java. Here is the code that responds to the button click and resets the browser settings to default:

} else if (preference.getKey().equals(resources.getString(R.string.pref_key_reset_default_browser))) {
    // Reset browser settings to default
    PreferenceManager.getDefaultSharedPreferences(getActivity().getApplicationContext())
            .edit()
            .clear()
            .apply();

    // Reset locale to default - US
    final LocaleManager localeManager = LocaleManager.getInstance();
    localeManager.setSelectedLocale(getActivity(), String.valueOf(Locale.US));
    localeManager.updateConfiguration(getActivity(), Locale.US);

    // Update the language selection (in dialog)
    final ListPreference languagePreference = (ListPreference) findPreference(getString(R.string.pref_key_locale));
    languagePreference.setValue(String.valueOf(Locale.US));

    // Scroll to selected item in ListView.
    final ListView mListView = getActivity().findViewById(android.R.id.list);
    mListView.smoothScrollToPosition(0);
    if (mListView != null) {
        mListView.setVerticalScrollBarEnabled(false);
    }
    // Half a second delay for better animation
    new CountDownTimer(500, 1000) {
        public void onTick(long millisUntilFinished) {}
        public void onFinish() {
            // Manually notify SettingsActivity of browser settings reset
            if (mListView != null) {
                mListView.setVerticalScrollBarEnabled(true);
            }

            if (getActivity() != null) {
                addPreferencesFromResource(R.xml.settings);
            }
        }
    }.start();
}

Let me walk you through the feature implementation logic. The first/parent if statement is located within am event listener function that watches the settings preference list using XML key attribute. If any preference changes the listener isolates the preference by its key and executes the logic for the corresponding preference that triggered an event.

Then the logic within the if statement clears the Preference Manager shared preferences. Meaning all the preference states are back to it original state. For example if the current state for the “Block analytic trackers” is on:

Capture.JPG After the shared preferences are removed the preference will be back to its original state – off:

Capture.JPG

However shared preferences are not the only thing we need to reset. The locale and language have to be set to its original value. The default Firefox locale is US and language is English. The locale is reset (line 9-11) and the language gets updated in the language custom dialog and settings view during the refresh (line 14-15).

Once the preferences are reset to default we need to refresh the view. And this is where the major issue comes in. The refresh has to be well animated and smooth to correspond to the apps quality and UI integration rules. I browsed through the Focus files to find the logic that would help me easily refresh the view. I found out how to refresh the view but the animation was not proper and caused some jiggling effect. So i had to come up with own logic to refresh setting activity with nice animation.

So here is what i did (line 18-36 of the above code). I decided to set a timer for half a second to complete the animation. Then while the timer is ticking i tell the preferences list view to scroll up to the fist item in the list. Once the scroll is complete i refresh the settings view (recreate the view). The reason why i implemented this logic is because the refresh will cause the view to shake since the “Reset” button is in the bottom of the view. If you create the settings view it will always drop you to the first couple preferences, thus the refresh will cause discontinuity in animation because you momentarily go from last preference to first preference. That is why i decided to scroll up first and then recreate the view so that no jumping occurs.

Now lets run a quick test to prove that the functionality works:

28xzvs.gif

As you can see i have changes a couple of preferences: changed language, turned off block dd trackers preference, turned on block other content trackers preference, etc. Once i clicked the reset button everything reset to default.

As you might notice the reset preference title and summary are always in English, since i have not localized these two strings. I originally planned to, but i decided it would be wise to get feedback on my code first before attempting to translate to more then 30 languages that Firefox Focus supports.

To conclude this release gave me unforgettable experience and enjoyment with Android.  I have learned new tricks and advanced my knowledge with mobile development. First thing i learned is the advanced XML and styling Technics used to develop the views. XML is very responsive markup language and it is easy to work with most of the time. Also i liked the styling and code documentation. No unnecessary comments and if code is commented it should be concise and to the point. Another thing that i liked is the fact that you work on Mozilla code, that more experienced and established developers contributed. It exited me a lot and gave extra enthusiasm to keep grinding and get the job done.

On the other hand working on Mozilla code is very stressful since it is a huge project that has thousands lines of code. Most of time i bumped into problems that were causes by me simply not being familiar with something. Thus i had to do a lot of reading, review and research before i could add a single line of code. overall it has been amazing experience. I am pretty sure that my solution will get criticized and i will have to modify the code, but in the end of the day that is something i expect.


Fix a bug in Brave Browser

In this lab, I will try to find and fix a bug in Brave Browser URL search bar using Test Driven Development. It is known that different browsers handle searching and URL parsing differently. Brave is relatively new browser, so it is likely it has some URL parsing bugs compared to other browsers. I will focus on search bar and try to compare brave search results to other popular browsers to see if the results match or not. If not i will discover what could be the cause and how to fix it.

First of all we need to install and run brave. Here are the installation instructions for Windows and Linux/MacOS.  Installing prerequisites and Brave might take some time, but once it is done open two separate command prompts and navigate to the brave project root folder.

  • In Window #1 run: npm run watch
  • In Window #2: npm start

Now brave browser should open up home page automatically. Ok, now it is time to compare URL parsing results of Brave, Chrome and Mozilla. Here is a list of comparison tests and its results:

  • "dog" –  relatively the same searching pattern in all three browsers
  • " dog "– relatively the same searching pattern in all three browsers
  • "dog cat"– relatively the same searching pattern in all three browsers
  • " dog cat "– relatively the same searching pattern in all three browsers
  • "https://www.google.ca/search?q=dog" – same in all three browsers
  • " https://www.google.ca/search?q=dog " – same in all three browsers
  • "https://www.google.ca/search?q=dog cat"– different in Brave, Chrome and Firefox have same results
  • " https://www.google.ca/search?q=dog cat " – different in Brave, Chrome and Firefox have same results
  • "/Users/humphd/repos/browser-laptop/dog cat.txt"– different in Brave, Chrome and Firefox have same results
  • " /Users/humphd/repos/browser-laptop/dog cat.txt "– different in Brave, Chrome and Firefox have same results
  • "file:///Users/humphd/repos/browser-laptop/dog cat.txt" – same in all three browsers
  • " file:///Users/humphd/repos/browser-laptop/dog cat.txt "– same in all three browsers

Based on the results above the URLs are different in cases when you have a space in between the search elements. Plus the Firefox and Google have same search results, so from now on i will compare Chrome and Brave only. Here is an example of how different Brave result is different from Chrome.

Brave:

Capture.JPG

Chrome:

Capture2.JPG

Brave makes the search much more complicated by not replacing the space with %20 in the search URL. Unlike Chrome it does not interpret spaces in the in the middle of the search string appropriately and does not catch them. Thus Brave always treats URLs/search strings with spaces inside as a string. It is likely a reg expression that is causing this behavior. Lets look into the code and find the regex that might fix this.

After exploring the source files i bumped into the /js/lib/urlutil.js module. Based on its source code it looks like getUrlFromInput method deals with accepting and formatting the search input into URL. If you review the code you will notice that the function only trims spaces in front and back of the input string, but it newer deals with spaces inside the input string itself. Here is the line of code i am talking about:

input=input.trim()

Ok so i have an idea where the problem is, but first we need to write the test that would validate if our future fix actually does what we want it to do.

The tests to validate search input are located inside the test/unit/lib/urlutilTest.js file. I have added the following two tests to make sure the inner spaces are replaces with %20 and outer spaces get trimmed. We validate if the search input is properly converted into a URL by reusing isNotURL method. Here is the test code:

test.JPG

If we run the test using mocha testing utility the the tests added will fails as expected since i have not implemented the fix yet. Here is the test result as of right now:

fail.JPG

Ok now we can work on the fix itself. First thing i tired was replace inner spaces with %20 in the input string after input gets  the trimmed.

input = input.trim().replace(/\s+/, “%20”)

However it dis not work. I spent some time thinking what could be wrong until a friend of mine pointed out that my regular expression picks up the whole input sting and replaces spaces, which is not what we want. We need to ignore the spaces in domain name. So he provided me with the right reg expression. Here it is:

letstr=input.trim().replace(/\s+([^\s]+)$/, ‘%20’)

And it worked. Now when i run Brave and insert the following https://www.google.ca/search?q=dog cat URL the search result matches exactly the Chrome search result. Here is the captured output:

Capture.JPG

So by editing single line of code we managed to fix this bug. Now lets rerun our test to make sure everything works as expected. Here are the test results:Capture.JPGCapture.JPG
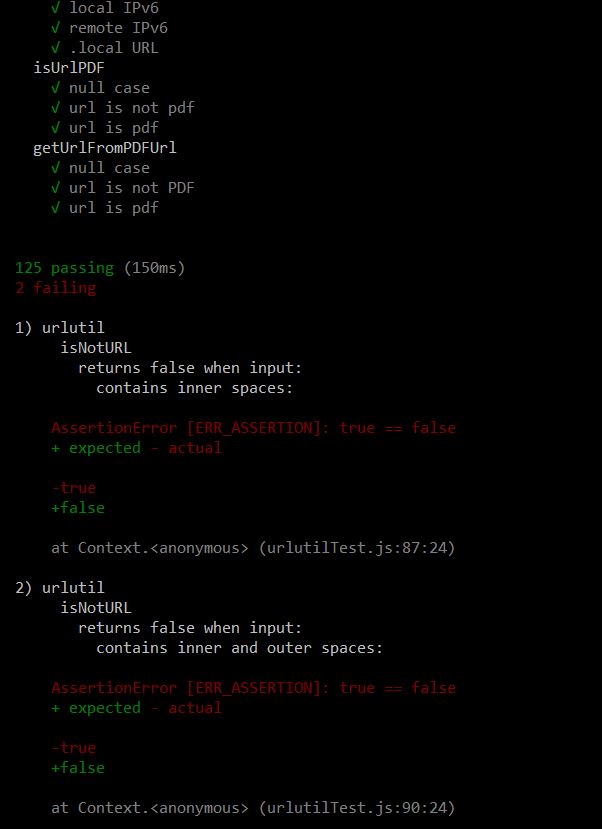
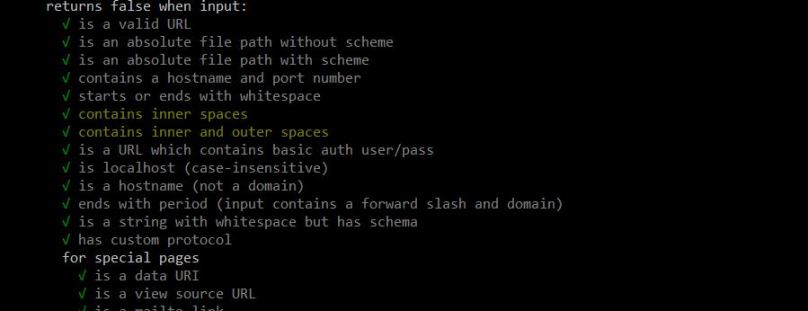
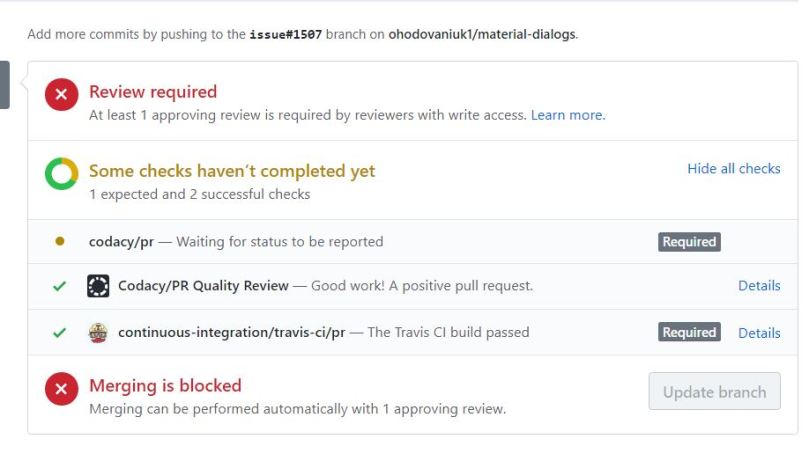
As you can see all tests have passed successfully. Now it is time to push the code on GitHub.


Bridge-troll theme switch

In this lab i will to add feature to change bridge-troll theme color depending on the day time. Meaning if the API is used during the day when the sun is still up the API will use regular/bright theme. Otherwise the API UI will have dark theme to make application more comfortable to be used during different times of the day.

First of all we need to clone and run the API to make sure the project gets build with no errors and functions as expected. To clone and build the API do the following.
1) Fork the parent repo
2) git clone the forked repo to the local machine
git clone https://github.com/humphd/bridge-troll.git
3) Open the project’s root folder using your preferred editor or terminal (i use VS Code)
4) Install the dependencies (run in terminal window)

npm install

5) Run the API in your browser
npm start
As a result you should see the map with your current location marked as a dot and all bridges around you. Note that the current theme is bright/white regardless if you run the API during the night or day.  Ok, now it is time to get to coding. To be honest I have read blog posts of other students prior to getting my hands on the API. So i already have general idea of what is expected and how it could be done.
First of all i need a to choose the themes that would be used in the API. Leaflet library offers some cool themes. The one that i liked the most is called Thunderstorm. So i chose the regular/bright theme to be  thunderforest landscape theme and dark theme to be thunderforest dark theme.
Now lets find the part of the program that sets with API UI theme. I figured that this logic is located in  ./src/map/base-ui.js module. Then i created a separate module called theme.js inside the map folder to set the current theme of the UI. Once the theme module was created i linked it with the base-ui logic since base-ui is the parent class that creates the UI. Once all the coding is done i run prittier to style the code and that is it.  Let me walk you through the code logic and describe the process in more details. Here is the logic implemented in the theme.js module:
1.JPG
As you can see the module has a single method that returns the theme depending on current state of the sun – current time. We can get the current sun state using JavaScript library called Suncalc which calculates sun/moon positions and phases. Inside the setTime function i initialized 4 local variables:
 tileUrl – holds the theme URL
currentTime – holds the current time in hours
sunsetTime – holds the current sun set time in hours depending on the your location
sunriseTime – holds the current sun rise time in hours depending on the your location
The theme is set when the function compares the current time with the sun set and sun rise times. If the current time is between the sun rise and sun set, we use regular/bright theme. Otherwise, we use dark theme. One the theme is set we return it to the calling method.
Here are the lines that i changed inside the base-ui class to set the theme based on the current time:
1.JPG
The current theme depends on what the setTheme method returns. That way we can automatically set the theme based on the current time. Do not forget to the remove the original tileUrl variable that was declared in the top of the file. Also import the theme.js module by putting this line below other library imports:
const theme = require(‘./theme’);
Ok, now it is time to test this thing out. If you run the npm start command while the sun is up, you should get the following regular day theme:
 2.JPG
When you run the app at night, this dark theme is displayed:
Capture1.JPG
To conclude, this lab once again let me learn something new open source features and tool like Suncals. It is has been another day working with open source which allowed me to test my skills and continue to explore.

My Contribution to Android Mobile Apps

In this blog post i will discuss what bugs i worked on and how i fixed them.

My first bug is related to aligning the check box label inside the custom dialog. The dialog checkbox text is aligned differently from the checkbox itself. Meaning the label text is not horizontally centered beside the checkbox, therefore there dialog looks like this:

Capture.JPG

As you can see the label text is aligned to the top, which is the opposite of what we need. We need to make it centered vertically. Lets find out part of the code that needs to be fixed. Initially i browsed through the code to find out how the each dialog is created. I figured that dialogs are not created programatically, they are created in a separate XML layout file. So i browsed thorough the XML layouts to find out which layout has the checkbox not properly aligned. There are a lot of XML layouts and they were named non-intuitively, so i decided to search the layout by string literal “Example check prompt” that is used inside the dialog. Once i found the literal inside the strings.xml i globally searched (Ctrl+Shift+F) the string attribute name and found the layout named md_dialog_input_check.xml. In the xml file i found this checkbox markup that is causing the issue:

<CheckBox
android:id=”@+id/md_promptCheckbox”
android:layout_width=”wrap_content”
android:layout_height=”wrap_content”
android:layout_gravity=”start|center_vertical”
android:layout_marginLeft=”@dimen/md_notitle_vertical_padding_more”
android:layout_marginRight=”@dimen/md_notitle_vertical_padding_more”
android:focusable=”true”
android:gravity=”start”
tools:text=”Don’t ask again”/>

The checkbox gravity is set to start, which is the equivalent of left align.  In Android the gravity will not center text vertically unless you specify so.  So the solution is simply center text vertically by replacing start with center. Here is what i got when i recompiled the program:

Capture1.JPG

As you can see the checkbox label is now vertically centered, which solves the issue. Now it i time to open pull request and commit my changes. When i opened the pull request i noticed the following error and warning:

Capture.JPG

The merging is blocked because the admin of the project wants certain people to review code before it gets merged. The codacy/pr warning which is somehow related to repo name change, which is weird since i have not renamed anything. Either way the prof said it is just a warning and the code can still be merged by the admin. So unless the author wants me to do something about it i should not do anything.

Ok, as my second bug i decided to open and fix and issue myself. When i build and run the QKSMS app i noticed that the keyboard does not hide fast enough when the back arrow is pressed. When you have parent child activity relationship you usually see the back arrow as an option to go back to the previous/parent view. In the QKSMS app there are cases when the keyboard has to be opened inside the child activity. So while the keyboard is open in the child activity and you go back to the parent the keyboard closes with almost one second delay. It is animation issue so i need to figure out what is causing the delay. Here is a screen shot displaying this weird behavior:

Capture.JPG

It is going to be hard explain the issue with a screen shot, so take a look at this gif to have a better idea of what i ma talking about. So as you can see there is a huge delay before the keyboard closes, so i decided to report this bug and opened an issue. Once i became more familiar with the code i found the SearchActivity.java file that could help me with this part of the app logic. I could not find out the direct reason why there is a delay, but i had an idea how to fix the issue. I have added the code to close the keyboard right after the back arrow is clicked. Once the array is clicked i told the app to close the keyboard asap. And it actually worked and there is no major delay.  The animation works smooth and causes no conflicts/issues with the rest of the code.  Here is the code that i added to the end of SearchActivity file:

@Override
public void onBackPressed() {
super.onBackPressed();
KeyboardUtils.hide(this);
}

This code listens if the back arrow is pressed and if so it immediately closes the keyboard that still hangs from the child activity. I also wanted to add an artificial delay to the back arrow itself, so that the arrow reacts a bit slower thus gives the keyboard more time to close. However i do not think it is necessary at this point since the animation works much better and is not as irritating as it used to be. Not lets push the code to the maim repo via pull request. My new pull request has also had a warning that somehow conflicted with GitHub. I talked to the prof and he advised me to add a message to the pull request notifying the admin that the issue is not caused by the changes that i have made.

At this point i have made two contributions to Android open source projects and my experience with it satisfactory. The hardest part of my open source journey is probably finding a good bug.  I believe i spent 2-3 times more time looking for a bug then actually fixing a bug.  Learning some GitHub tricks helped me a lot, but it took me some time to squire and successfully use those tricks during my research.  As far as i know other students also have had issues finding an appropriate bug. Either it looks too complected or someone is already working on it. It is energy consuming and disappointing to browse through dozens of bugs and then realize that it is not a good fit for whatever reason. The second hardest thing i noticed while working with open source is the number of source code files and lines of code you need to deal with. The way the files are organised and named is also causing a lot of trouble since you can get lost very quickly in the hierarchy of files. While working with Android projects i acquired a good strategy that helps me find the appropriate piece of logic i need to work with. I do global searching based on any keyword that could be related to the bug. When you do the testing to reproduce the issue, i notice the strings used in the app. Then i search those strings globally in the Android Studio. You can do global search by any keyword like class or activity name, variable name, etc. Searching by keyword is much faster and much more efficient then randomly attempting to find the code you need. Just pay attention to how things are named and you will make your life much easier while working on someone else project.

To conclude this release taught me to be patient and calm all the time. If you do not stay calm and patient you will eventually give up on the bug and leave for another day to solve. Programming is not only about your skills, it is also about your mental strength since not every person is able to sit down and work on something for hours. I have also had good opportunity to advance my Android skills as well as get more exposure to GitHub.


Introduction to Projects i would contribute

Introduction

For the OSD600 release 2 i have decided to explore and contribute to real open source project available on GitHub. This project is intended to provided me with the necessary knowledge to get involved with the open source as well as get valuable experience working with someone else code, programming Technics and the technology in general. In this introductory blog post i will talk about the projects i want to contribute to, what these projects are about and why i picked them. There are millions of open source projects that you can work on, so picking the right project and a good bug is the first step to take. I decided not to waste time exploring all published projects, so i figured out that it would more practical to work with the technology/programming language i like the most. I am a big fan of Android and IOS mobile development, since these two dominate the market and i enjoy building mobile apps the most. For this release i will work with Android only, because i use Windows and as you know IOS mobile development requires native MAC OS tools like Xcode.

I have tried to search for Android project by topic, by issues open, by language, but there were thousands of hits and i physically could not go through most of them. I used different tactics to find a project including search by start, recently updated projects, etc. Projects that i found were either not very active anymore or did not have enough issues to work on for entry level contributor. To be honest i got simply overwhelmed by the number of projects that were out there and amount of searching i had to do. It took me some time to figure out that it would be easier to contribute to the project that i am familiar with. Meaning the projects i have used to build my own apps.  That is how i decided to contribute to material-dialogs and QKSMS.

What is the project about?

The  material-dialogs project is intended to work as a library that would allow the developer easily create and customize the various dialog in the any app. Android core libraries do not provide well designed, well animated and interactive dialogs. When you create a new project and decide that you need a dialog to display an error message or accept user input, you realize very quickly that you are extremely limited in terms of being able to customize the dialog and make it look attractive and functional in the same time. The dialog templates that Android core libraries allow you to use do not look impressive and well designed, but rather outdated. That is why developers have to either create custom dialog from scratch – build and design them based on own ideas and imagination or use other open source library that would provide dialog templates with high customization capabilities. I personally did both. I created my own dialog and it took me a while to get that thing to look and function properly. I also used the open source dialog libraries like material-dialogs, which made my life much easier and saved me a lot of time.  So material-dialogs  is an open source project that allows the developers create and customize a variety of dialogs. This library offers a variety of dialog options such as: basic, dismissing, neutral, check/radio box prompts, list dialogs, multiple choice dialogs, etc.

The QKSMS is messaging app that can possible replace your default messaging app since it  has very good looks and it also highly customizable. It is an average messaging app that is not super special, just an app that does its work. This app is no different from other messaging apps, however it is impressive only because it has been build by only one man and not a huge corporation. It is a good example to showcase how a messaging app can be build.

Where is the code located?

Both projects are published on GitHub. The code for the material-dialogs project is in the master branch, while the QKSMS is in a separate branch. I always thought that the up to date code for the project is in the master branch if no other branch is mentioned in the documentation. However i have had issues identifying the up to date code for QKSMS, which caused me a lot of troubles later on (will talk about it in the net blog).

Where are the docs and how can you get involved?

All the documentation for material-dialogs project is inside the README file. To be honest i am impressed by how well documented the project is. Especially the table of contents, which provides detailed instructions how to use every library tool to developer advantage. Plus the documentation is well organised and thought trough by the author, which makes it easy to read and understand right the way.  The only negative thing i noticed in the README file is that the project seems to be unwelcoming to contributors (in the same time a lot of contributors actually contribute). The documentation does not mention anything in regards to what happens if you want to contribute. Based on the README you can be a user and contribute only by opening an issue or feature request. Like i said a lot of people contribute to the project regardless and most of the pull requests get accepted. You can get involved, but pleasant cooperation and good first impression is not guaranteed. You can find out more about contribution process based on pull request history rather than the README itself.

In the other hand QKSMS has even worse project documentation. There is nothing except the license and contact information. The contact info makes it much more welcoming since you can reach out to the author via email. Also the contribution history says it all and you can get an idea how and when to expect a response. In both cases you have to simply submit a pull request and wait until someone responds to your request. “Don not overthink it and push your code” is the strategy to use.

Where can you go to get help?

Since the projects i contributed to are relatively small, there is not community or contributor page. The only way to get help is to reach out the author via GitHub or email if provided. Fortunately, i did not need any help to fix the bugs. It was much more challenging for me to find the project to work on rather then the contribution process itself.

Conclusion

While introducing myself to the open source projects i have not learned anything special about Android programming or any cool language features. I learned about using GitHub itself the most. How to find the appropriate project to work on, what are best searching Technics are the things i learned more than anything. I figured that fixing a bug might not be the hardest part of the contribution process since i spent most of my time browsing through various projects. At first i did not know what king of project to contribute and what language i am the most interested in at the moment, so making up my mind took me a while.

Getting familiar with JavaScript Open Standards

This week i have been introduced to open standards and JavaScript testing under ECMAScript standard. In this lab i will walk through some tests in order to better understand how testing works and what it takes to build own tests. JavaScript open standards is a set of rules that have to be followed in order for the technology work as expected globally regardless of the development environment, product type, etc. To build and run the JavaScript tests i use Test262-Harness, which allows us to run ECMAScript using Node.js.

First, lets get familiar with Tests by reading CONTRIBUTING.md and README.md. This documentation provided on GitHub is a good place to start with since it provides the information necessary to understand the testing process, tools and scripting features that you have newer previously worked with.

Now we can install Harness by executing the following instructions:

git clone https://github.com/tc39/test262.git --depth 1
cd test262
npm install -g test262-harness

Note that the above commands have to be run in terminal if you are using MacOS or Git Bash if you are using Windows. Also do not forget to have up to date version of Node.js installed.

Once the harness is installed it is a good idea to execute the tests downloaded to check current status of the tests (tests that pass of fail). You can execute the tests by running the below command from test262 folder:

test262-harness test/**/*.js

If  everything is Ok you should get the following:

Capture

As you can see 6 tests failed, which seems to be normal behavior based on what i have read in other students blog posts.

Prior to writing own test we need to get a general idea of the test specification we plan to work with. Meaning get familiar with script you are attempting to test, in my case i need to understand the implementation of Array.prototype.reverse(). This method simply reverses an array of elements.

Once you understand what reverse does we can write some tests to test certain use cases to make sure the reverse function behaves as expected. I decided to remake this test, which is already provided to us. The test logic is concise and simple, so making modification to the test was not very hard at all. In the file i noticed an if statement used to do the array comparison:

if (reverse !== x) {

$ERROR(#1: x = []; x.reverse() === x. Actual: + (reverse));

}

I decided to remove the if to do the comparison and output printing and use one line   sameValue()  assert module method to do the comparison and message printing. The function is straight forward and returns a Boolean if two arrays contain equal values. So, i basically simplified the initial test code to this:

assert.sameValue(x, reverse, ‘#2: x = []; x[0] = 1; x.reverse() === x. Actual: ‘ + (reverse));

I did that to all 6 tests and my test can be found here. The idea of the test is to go through some comparisons before and after reverse method is called to check if the reverse did what is expected and the function logic does not cause any issues.

Note that i have added my test to the ~/test262/test/test.js file and i run the test using test262-harness test/*.js command.

To conclude, today i have learned about open standards and what it means to contribute to open standards. Now i am familiar with the process, tools and some useful Technics to write and run automated tests using Harness. Also i once again learned new things from GitHub and about GitHub. I’ve also learned more about how JavaScript and how easy it is to understand and write tests.

Fix a bug in VS Code editor

In this lab i will try to explore and possibly fix a bug in Visual Studio Code, which is Microsoft’s open-source development environment. I have installed MS Code in my last blog post, so feel free to refer to it if you haven’t installed it yet. OK, MS Code has a over 800 open bugs in GitHub. For this lab i have to pick one.

I have walked through some of the bugs and i could not find a good beginners bug to fix. So, instead of searching for an relatively easy bug i decided to pick the bug that is listed/recommended by the prof. I have decided to pick up the issue #26956, which relates to VS Code being unable to search files that start with “./” followed by the filename.

First step would be recreate the issue and confirm behavior reported. Steps to Reproduce:

  1. Open VS Code in development mode (to debug the issue)
  2. Press cmd+p
  3. Type ./ and a file name that exists in the root of the project (in my case searchTestFile)

Here is the search output result:

So the successful search shows the file i recently worked on (my test file) and then open the file if i click Enter. However, the search with the “./” in front of the file name wont show any hits. So, i reproduced the issue and the behavior is identical to what has been reported. But is it really a bug? I believe the search for a file is expected to search a file by its name. And if you want it to search a file with “./” in front of the file name it is your preference and should not be considered and reported a bug. What happens if someone wants to search a file with “//.’%” or any other string in front of the file name. So it looks like a not very smart feature request that i do not believe too many people will agree to implement since it does not carry any logic behind it other than i can search for a file with “./” in front of a file. OK, I need to stop hating on that “bug” and continue the research.

This issue looks similar to the regular expression issue we have worked on in class. So, i assume i will have to simply edit the the “Quick Search Dialog” search function a little bit and should be good to go.

Lets debug the VS Code Quick Search to find that reg expression function (i already forgot the steps we have done in class, so bare with me).

First i opened the developer tools window, expanded all the HTML code blocks to locate the piece of markup that is responsible for the Quick Search functionality. It happens to be is this part:

Capture.JPG

I have put a break point beside the quick-open-widget class and reopened  the search dialog again. Then i was shown the first class and function that got triggered by the debugger. I used the “step over the next function call” debugger button to move to the next function until i found something useful. So, walked through those functions and i noticed that those function deal with showing and hiding the quick search but they do not deal with the input. So, i stopped clicking the next debugger button when i saw the search dialog listener that basically listens to the input that is inputted in to the dialog in real time. So when you start typing that listener triggers other functions that do the validation and return the result.

I continued debugging after inserting some input into the quick search, so that validation functions including regex functions would be show (at least in theory).

I kept on clicking the next button and the debugger kept on opening source code files and i noticed QuckOpenController.ts file that looked a good place to begin with, but the debugger did not trigger any functions that deals with the regex. It was kind of disappointing since i did not understand most of the logic i looked at, but i did not have time to go deep into it. Plus the prof told us that you dont have to completely understand the code you work with, you can still fix things in that code. So, it took me some time reading the files, so i decided to step away from my original plan and do a global search inside the VS Code source files.

Capture.JPG

I opened the search from Customize and Control DevTools menu or simply Ctrl + Shift + F. I thought it is a good idea to search the function by string, keyword, etc.  So, i typed in the error message that is returned after unsuccessful search – “No results found” to see which file contains the logic handling the error, so maybe i could find the reg expression that triggers the error also. The search showed that this error is triggered when you check if the string of matched files is empty, by that is too far from what i need.

I searched for different keywords including “quick search”, “reg”, “search”, etc. And i was lucky enough to bump into  prepareQuery function inside the quickSearchScorer.ts file. I found it when i searched for “search” and “quick search” and both these lines are part of the comment beside the method. And you know what, this function does have a reg expression that looks like what i need.

Capture.JPG

I also did but a break point here to make sure this method is called during the debugging. And yet this method does get called since it prepares a search value/input for scoring in quick open by removing unwanted characters. So i found a candidate for our fix. The weird thing is that this method does not pop up when i debug the quick search and go step by step through the triggered methods, but it is there when i put a break point beside it. I believe it happens because the debugger does not really go deep inside each method that is why my method did not show up, but was executed on the background. I am not sure though.

So my solution is to simply ignore the “./” so that the search works normally and still allows to put “./” as part of the path. Of curse that is not the brightest solution, however i do not understand the special meaning the user who reported the bug wanted to implement/fix. He mentioned that the search did not work when you put in that extra characters and all he wanted is to find a file, so that is what i am going to do – allow him to search the file.

I have tried to rebuild the project and test the modifications but the rebuild does not work for me. I probably did something wrong. Will figure out how to rebuild the VS Code and continue.

In conclusion i learned how hard it is to fix a bug in an unknown  environment using completely unfamiliar Technics and tools. The only thing that is surprising to me is how hard and confusing it is to change and successfully rebuild the vs code with modifications. I still haven’t figured it out yet.

REST API: Phone parser

In this blog post i’ll walk you through my latest open source project i have worked on. Project details can be found here.

WHAT I BUILT

For part A of this project I built a simple web service API using JavaScript scripting language and frameworks such as Node.jsExpress. The API is primarily based on the idea of parsing phone numbers through the web service GET/POST request and the project takes advantage of google-libphonenumber open source library to parse the numbers. Libphonenumber package helped me to parse and validate phone numbers from plain text and text file into a clean and formatted phone numbers array. That array is then sent back to the user as the response. Ok, here is an example and functionality explanation in more details.

The user is able to send two types of request to the API and should receive two different responses. The first request type is GET.

Capture.JPG

As you can see the API accepts a URL that contains the a string of random characters, signs and phone number of course. One the “Send” is clicked the GET request is sent to the API and after short validation phone number is parsed into an array. Then the local host responds back to the front end with a JSON array containing the phone number user tried to parse. Simple yeah?

Next the user should be able to attach a text file containing base64 encrypted phone numbers and send it to the API with a POST request. That file has to be identified, read and phone numbers must be extracted and returned back to the user.

Capture

Also big part of the project was making test file that would aromatically trigger certain localhost URL’s and validate the output for different use cases such as no string, no file etc. The tests must verify that the API behaves as expected in certain scenarios.

The entire project including source files, testers and usage instructions can be found here.

For part B of this project i had to fix bugs/issues reported by other student. I have fixed two issues for apetov phoneparser-js project.

The first issue i picked was to write a tester that would deal with the following scenario:

  •  The Users enters the following URL: “/api/phonenumbers/parse/text/nothing” and commits a GET request. The API validates the text string “nothing” and returns a response with status 400 followed by the empty array “[]”.

Here is the solution i provided for the above scenario:

// GET - nothing
it('should return an empty array', () => {
    chai.request(app)
    .get('/api/phonenumbers/parse/text/nothing')
    .end((res) => {
      res.should.have.status(400);
      res.body.should.be.a('[]');
    });
  });
});

Here is the result when you run the tester:

API endpoint /api/phonenumbers/parse/text
√ should return [‘+1 416-491-5050’] (86ms)
√ should return an empty array

As you can see I have written the tester code that automatically requests the URL: “/api/phonenumbers/parse/text/nothing”, runs the phone parser function and catches the status code followed by the string output “[]” returned from the API. Then compares the results caught with the results that are expected to be returned and display the message “ should return an empty array”  if the comparison is successful.

The second issue i fixed was to write a tester that would add support for MS Word document. Meaning the phone parser should be able to read from the word document and parse the right phone number array.

Here is my solution for that issue:

app.post('/api/phonenumbers/parse/word', upload.single('file'), (req, res) => {

  if(!req.file) {
    res.status(400).send('No file received');
  }
  else {
    var extention = req.file.originalname.split('.').pop().toString();

    if(extention == "doc") {
      var fileContents;
      var msDoc = req.file.originalname;
      var extracted = docExtractor.extract(msDoc);

      extracted.then(function (doc) {
        fileContents = doc.getBody();
        var fileText = fileContents.toString('ascii');
        var buf = Buffer.from(fileText, 'base64');
        var numbers = buf.toString('ascii');
        var numArr = numbers.split('\n');

        var finalArr = numParser(numArr, res);

        res.status(200).send(finalArr);
      });
    }
    else if (extention == "docx") {
      docxExtractor.fromFileWithPath(req.file.originalname, function(err, contents) {
        if (err) {
          res.status(500).send(err);
          return;
        }
        else {
          var fileText = contents.toString('ascii');
          var buf = Buffer.from(fileText, 'base64');
          var numbers = buf.toString('ascii');
          var numArr = numbers.split('\n');

          var finalArr = numParser(numArr, res);
          res.status(200).send(finalArr);
        }
      });
    }
    else {
      console.log("The document attached is not of Microsoft doc(x) type!");
    }
  }
});

The above code is pretty long since i had to add support for MS Word extensions of two different types: doc and docx. The code logic checks if any doc is attached first. Then depending on the document extension the program reads from the file, formats the doc content and sends the phone numbers to the phone number parser function for further processing. To read from the docs i use the following libraries:

var docxExtractor = require("textract");
var WordExtractor = require("word-extractor");
var docExtractor = new WordExtractor();

The “textract” library helped me to read from .docx file and “word-extractor” dealt with .doc files.

I have also learned Git in more details since all the work is shared through github. Learning Git was primarily based on commands and features that Github offers. I have learned to create repositories and branches; push my own code to the repo, open issues and report bugs; fork someone else repository; clone the source files and build it, create pull requests, merge the code, etc.

THE PROCESS

The major step in the project development process was to make a decision in terms of what language and framework to use. I have previously created web services using C# and .NET framework, build and published websites on different hosts, however i have newer created a web sever using Node.js localhost. I have always wanted to learn Node.js and its principles since i like web development a lot. However, i have this bad programmers habit not to learn things i don not need to use right now. Thanks to the this course i finally got the opportunity to make myself learn and use Node.js framework. I have used JavaScript before, so learning the language was not an issue. I simply watched a couple of videos about Node.js and was ready to get to work. The environment set up took me some time, since i had to install different tools that would help me get started. I have done a little bit of a research regarding the API requirements in order to draw a picture in my had in terms of how the API should function. Then i started coding and figuring out things during the process.

When it comes to fixing bugs the process got much easier since i already knew whats going on and what this thing is all about. I picked up an issue and used skilled previously acquired to fix it. First i forked and cloned the code. Then i build the project and started working on the issue. I also pulled the code to the original repo via pull request.

TOOLS, LANGUAGES, AND DEPENDENCIES

Like i previously have said I used JavaScript and Node.js frameworks to set up the basic development environment. As i started coding i figured that i need to use more than just two tools, therefore i also used expressmulter npm library for handling the upload and data content of text files, google-libphonenumber to parse and format the phone numbers. I used the above since the prof recommended express and google-libphonenumber. And i used multer because its the most popular and commonly used tools for file uploading. Also i looked at some other projects that used the same tools to deal with similar projects. For creating the test file i also found out about mocha, and chai dependencies that were commonly used for testing purposes.

When i worked on fixing bugs i was introduced to the textract npm library that helped me to deal with adding support for MS Word Documents. The library allows to read from .docx file (it also says on the website that it allows to read from .doc files also, but it did not work). I also used word-extractor  dependency to dealt with .doc files. I chose these two libraries since they were my first hit on google search and because they worked without any issues right the way.

CHALLENGES

Overall this project was not as hard as i thought it would be. The man reason is that we have had plenty of time to do it and there is nothing worse than time limits on a task you are not familiar with at all. However i still faced a couple of slight challenges. On of them was to setting up the development environment. Was it extremely hard? No of course not, but since i am very impatient it took me some extra energy to set everything properly before getting into coding.  Setting up the environment was not just downloading the Node.js , it also included finding the right testing tool (i ended up using Postman), finding the right editor/IDE that would be intuitive and easy to use (i used phpStorm), learning commands to run/terminate the localhost, etc. I have also faced some random error messages that disappeared after i either rebuild the project or restarted the localhost. One of the main challenges i faced was to create test file. Testing was newer an issue for me, however i have newer done testing with Node.js and the syntax used to do testing was awkward and hard to find online (likely just for me). I was lucky to go through other student’s repo to find out how to do testing properly.

My other challenge was using git hub from command line. I am not a big fan of command line when there is a beautiful GUI i could use :). I had an issue creating a pull request to share my fix with the original repo. A couple of times i created pull requests with my own repo but not the repo of the other student.

MAINTAINING VS CONTRIBUTING

Up until last week i have newer contributed to someone else project officially (there is no legal prof i helped someone). I have always worked on my own project and that is what you are often expected to do as an undergrad as college.  I like to code for myself because i feel free and work on my own work terms. For part B of this project i had to contribute to someone else project and fix a couple of bugs. To be honest, i did not feel like i will enjoy contributing to other projects. However once i contributed to the first issue and the code got merged soon i felt satisfied since that was new experience to me.  Contributing was more fun than i expected. I personally enjoyed both maintaining and contributing. I understand that nowadays you have to be able to do both: start from scratch and start somewhere.

WHAT I LEARNED

First and foremost i leaned new technology and acquired new skills that will be beneficial in my future career. I believe JavaScript is one of the most influential languages nowadays and getting more practice coding using it is a pleasure. I learned how important it is to stay calm and composed while working on a project you newer worked on using the tools you newer heard of.  I also got more practice using git through command line.

WHAT I WANT TO LEARN MORE ABOUT

I would love to get my hands on Angular.js and continue working with Node.js.

Installing Visual Studio Code

In this lab i will install and configure Visual Studio Code Editor, since we need a reliable editor to work with various open source projects. VS Code is a platform independent  source code editor that support various languages and frameworks and is also highly customizable. I  will configure the editor as a regular user and also as a developer.

First, lets install the VS Code as a user. You can download and run the package from here. The installation process is very easy and straightforward, you just need to follow the steps. Once the setup is done we can open the VS Code and start customizing our environment. Since i have used Visual Studio before, the editor looks very familiar and it did not take me too long to get used to using it. The background is black by default, which means the environment customization is already done for me :).  You can add the extension you need by clicking “Tools and languages” tab. To be honest the list of extensions is huge, so i dis not even try to walk through all of them, i simply installed the most popular and familiar tools. I have installed the following extensions:

  • C/C++ – language support and debugging
  • C# –  language support + .Net framework
  • Debugger for Chrome – debug JavaScript code in Chrome
  • Go – language support
  • HTML CSS Support – support for HTML based pages
  • JavaScript and TypeScript – another scripting language support
  • mssql – connect to MS SQL server, Azure, manage database connections
  • Node.js Modules – auto completes JavaScript/Typescript code
  • Python – language support
  • Swift – language support (because i love mob dev)
  • Terminal – enables command line directly in the editor

I believe the above features will be most likely used during the course. That is why i installed most of them.

Now lets install the VS Code in developer mode, so that we could contribute to the project in the future.

The contribution instructions, download links, dependencies and command are listed here. Note that i am Windows user so some of the commands are unnecessary for other platforms.

Ok, so we need to preinstall the following packages prior to VS Code installation in dev mode:

  1. Git
  2. Node.JS,
  3. Yarn,
  4. Python 2.7 
  5. Visual Studio 2015

Once you the above are installed open the command line and clone this git repository into an folder you like. Then go to vscode folder that you just cloned and run these two commands:

> git config –global core.autocrlf false

> git config –global core.safecrlf true

This important and will save you a lot of energy and time in the future when you do testing. These commands fix the line endings we have in our source files on Windows. Ok, now run yarn command that would install all the the dependencies you need. Then run yarn run watch command to build the dependencies you need. I am not sure about other platforms, but Windows acts weird during the installation and you might need to terminate and restart some of the commands (i guess it is normal behavior, since i read a couple other blogs and they report the same thing). The installation process takes a some time and throws some warning all the time, just ignore them. If the prompt is froze, like i said just terminate the command and rerun the command. Once the above is done, you have successfully installed VS Code. To check if everything is ok run  .\scripts\code.bat command that will trigger the VS Code editor, but this time in development mode. You should see the following:

Capture.JPG

You can try out the debugging tool by using Chrome Developer Tool. In the VS Code just Press Ctr+Shift+P to open the search windows and type Toggle Developer Tools, then click on the result. You should see this:

Capture.JPG

At this point you should be god to go, except we need to run the test script to make sure everything runs well on the background also. So navigate to vscode folder if you are not there already and run  scripts\test command to test automated testing. The first attempt will likely fail, so rerun the command and the test should succeed.

Overall the VS Code editor looks appealing and useful. It is surprising i have newer used it before. I am glad i discovered a new tool that could potentially same me some time editing source code in the future.

I have also read about the open source projects the VS Code is based on such as Electron, TypeScript. EsLint, Node.js and other frameworks. I figured that VS Code is predominantly made of the Typescript language logic an Electron GUI design and animation. Also i got to know some very powerful and interesting frameworks opensource offers that do have a major impact on today’s application market.

Exploring the open source project – Swift

Swift is a relatively new programming language designed to create more powerful, faster and secure mobile applications for Apple platforms such as macOS, iOS, watchOS and tvOS. Swift is a tool that makes IOS apps functionality and design unique and appealing to the customer. It allows the developer have access to the up to date technology due to continuations improvement of the language and features developers love to use. Swift code is safe by design, but it still allows to run the applications faster than ever (Apple previously used Objective-C which is still widely used).

Apple has started working on its own modern programming language around the year of 2012 and they presented the Swift in 2014. Swift has quickly become one of the most popular languages and has pushed Apple products and technology to a new level. Swift has inherited the main and most helpful programming concepts, improved them and created some of its own, which makes Swift an easier and more practical for developers. Swift 4 is and open source project – Swift.org that has source code available, bug tracker, mailing lists, which allows people contribute to the project.  Project community of developers (Apple Inc mostly) work together to make Swift even better. People can also contribute via GitHub and other open source platforms.

Since Swift has become the main language of Apple company, therefore not too many open issues exist. Apple crew has obviously has made the language clean and bug free and only minor and platform specific issues are reported. Around 500 developers on Github have contributed to the project, but i believe there should be more people working on this project if you take a look at the official number of people Apple has hired to work on Swift related projects.  Apple mainly used Swift to develop mobile/regular applications for iPhones, iPads, iWatches and Macs.